Thursday, October 30, 2014

Create a "Meet the Mormons" - "I'm a Mormon" Book


With the new "Meet the Mormons" Movie that is out, and all of the fun "and I'm a Mormon" videos that are out, our Seminary decided to make a book to give to our Stake President.  Here is how we did it:

Here is the cover of ours:

We printed everything out on white card-stock.  If you want to use the one below, just click on the picture to make it large.  Then right click and save it into your pictures or copy and paste it into your print program.


I designed a more generic cover if you would like to use it:

Then on the first page we put this song.  It is our Stake President's favorite song:


Here is another version done in the chalk board style:


Then we made copies of the page below for each student. We had previously taken pictures of each student so that they were already to go.  We then had them each fill out their own.


Here is a sample one that I did of my daughter:


After they had completed an "I'm a Mormon" sheet we sent them out with a Book of Mormon and this handout to help them know how to prepare for sharing it with a friend. Just click on it if you want to get a copy.


The students had a lot of fun making the book 
and our Stake President loved it!

I hope yours turns out great.


Wednesday, October 29, 2014

Missionary Munchies Printable


I made this printout to use with the avery 5163 address labels.  To use it just click on it to make it larger.  Then right click and save it into your pictures, or copy and paste it into your printing program.

Missionary Munchies


I attached them to fruit snacks that I bought at target.  I thought that the fruit snacks were perfect since they were shaped like little fruits.


How to let the Seminary Students teach themselves with no help from you! -Doctrine and Covenants 38, Lesson 42 & 43 Lesson Plan for Seminary

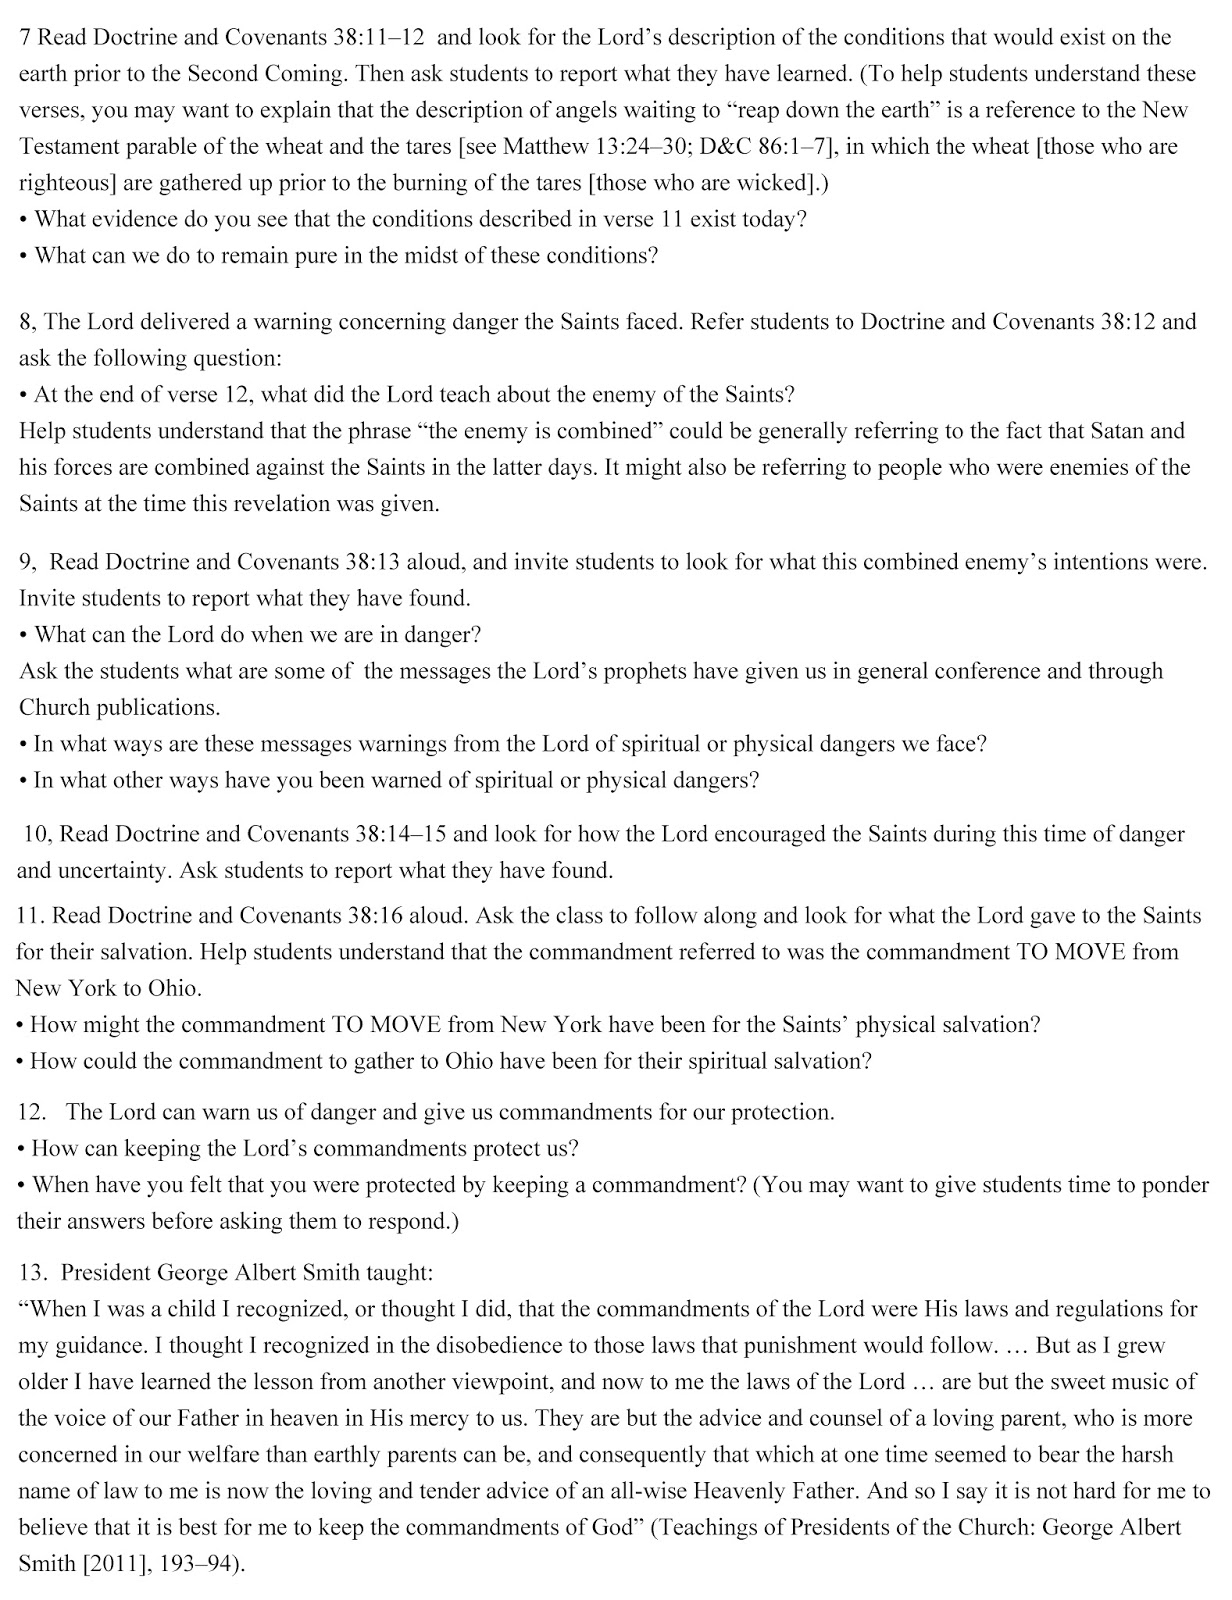
On Halloween I surprised my class by making waffles.  I knew that I would be busy, so I broke up lesson 42 and 43 into small parts so that each student had a section.  I have 26 students, so I needed to use both lessons.  The parts that we didn't get to we finished the next day.  This is how I assigned who got what part of the lesson.


You could do this with any lesson.  I adapted my lessons from the manual by make a few small changes and then broke it up into 25 separate parts (one for each student). I printed out the lesson as it is typed below.  I cut up the lesson by numbers.  Then I folded each part of the lesson and wrote the number on the outside of the folded paper.  I placed the papers in order in a small box and placed the box at the top of the sign in sheet.  As the students came in they took the number out of the box that corresponded with their sign in number.  

Here is the lesson that I did.  It is almost exactly the same as in the manual, except a few little quirks to accommodate having all the students teach it.  To use it click on it to make it large, then right click on your mouse.  You can either copy  and paste it, or save it into you pictures and print it in your printing program.


Lesson 43 & 43 Page 1


Page 2


Page 3


Page 4


Page 5


I hope that this lesson works out for you.  

It really worked out great for my class.  The students always impress me with their knowledge. We got all of it done in time, and I was free to cook waffles while the students taught.


Monday, October 27, 2014

A "Missionary Handbook" Workbook to aid in the study of D&C 30-34 or/and D&c 42 or Doctrinal Mastery


Call your seminary students on a mission.  They will love it!

I put together this book to help my Seminary class study the D&C  or the Doctrinal Mastery for missionary work.  I have done this over several years and have found that my students love being called on a mission!  It makes this project seem worth it.

I first called my students on a mission.  I did this by letting them choose an envelope with a mission call in it.   They had to locate the other student who had the same call as them.   Here is a generic version of the letter that I gave them:

Seminary D&C Mission Call:
Seminary Mission Call D&C Word Document

Seminary Doctrinal Mastery Mission Call:
Once each students had their mission calls they put a sticker on the map and wrote their names next to it.  The map I had printed as an engineer copy at Staples for only $2.

Map:

After the students have marked their mission on the map you can give them a name tag.  This one fits the Avery address label 5163.

Name Tag:


Here are the printouts for the Handbook.  Be sure to use card-stock for the cover.

Doctrine and Covenants Cover:
(Cut in half to create two covers)


Doctrinal Mastery Cover


Inside Cover:
(print on the backside of the above cover)
D&C 30-35
First set of pages:


Second set of pages:


D&C 42
Doctrinal Mastery

Quote from President Russell M. Nelson


Here is how I assembled it.  I cut the first set of pages and the second set of pages into 4 equal quarters.  
Then I put the piles in order. 
 See the picture below:


Fold the cover over then place the pages inside the cover.  


Staple along the folded edge.  
It helps if you have a heavy duty stapler.


For a snack I served Missionary Munchies.  To see how to make them click on the picture above.

D&C Scripture Mastery #8 18:15-16 Test Practice Test Plus Game Ideas

Here is the practice test:


And here is the back side:


Here are the games that I played with this test:


Say it fast:

I had each student say it as fast as they can.  After several tries we timed it to see who could say it the fastest.

Write it fast:

This is a lot like the one in the D&C Manual but I decided to change it up a little bit.  I gave everyone a piece of paper.  Then I divided them into groups of  3.  When I said go they all had to start writing.  When I said switch, they had to all switch, and then write where the other person left off (this way everyone is writing, not one person).  The first group to finish writing all three of their scripture masteries won.

Here is the target that I made to go with this Scripture Mastery.
To get targets for other scripture mastery go to their link.

\
Target Backside:


The Seminary in a Sack item for this Scripture Mastery is a 1 charm.  To see all of the Seminary in a Sack items click on the picture below:


To see all of my seminary ideas go here:

25 Days of Christmas Service Project to Send in a Care Package


Here is a service project that I am having my Seminary students do for the students who currently have family members who are serving a mission.  You could also do this with the Primary, Mutual, or as a family. It could also be sent to someone serving in the military.

I had my students color and cut out one of the ornaments below.  Then they wrote a message on the back of their ornament.  We wrapped up each ornament with something small, like some gum, Kleenex, chap-stick or kool-aid and wrote the number of the ornament on the package.  For day 1 I included a picture of my seminary class.  For day 25 I included a letter from their family.  

It works best if you print them out on white card stock.  Click on the picture to make it large.   Then right click your mouse and copy and paste it into your printing program, or save it into your picture files.


Days 23-25


Days 18-21


Days 14-17


Days 10-13


Days 6-9

Days 2-5


Day 1
(I wrote a message like "to Elder Jones from The Mission Drive Seminary class")


Stars


Here is a  helpful hint.  If you are sending these to more than one person, then color code each batch of ornaments for each person.  For instance, Elder Jones would be blue, Elder Smith would be green, Sister Black would be pink.   I just colored the around the number with the color of the missionary.  That way the students could customize their message to fit the missionary.
Next I drew a Christmas tree on half of a disposable tablecloth from the dollar store.  To make it symmetrical I folded it in half and drew half the tree.  I then turned it over and drew the other half, tracing the lines from the first half.  The tablecloth is transparent enough that I could see the original lines.  My friend just made hers into a triangle tree because it was easier.  After I drew the tree I wrote the numbers 1-25 randomly all over the tree.
Here is what the tree will look like after the recipient hangs all the ornaments on the tree.
For December 1 the package included the first ornament, the tablecloth tree and the star with a note that explains how the 25 days of Christmas work.


On the outside of the the presents I attached the gift tag that corresponds with the number of the ornament in the package.  I printed them out in the color that I assigned to the person.  For instance Elder Jones' would be printed in blue, and Sister Black's would be printed in pink.

Christmas Gift Tags 1-16


Christmas Gift Tags 17-25


After I wrapped all the gifts with the ornaments and attached all the labels here is what the presents looked like.
And they all fit into this US Mail flat rate envelope.  
It cost about $25 to send it to a foreign country.  
If you are mailing in the US it costs around $6.10.
Here is the link to order the envelopes:


I have another care package idea for Easter.  Just click on the picture below to check it out.


If you would like to see all of my seminary ideas go here: